Contributing data to the Svalbox project#
Community-contributed data resides in the Svalbox community in Zenodo [EuropeanOFNResearchOpenAIRE13] (explore the data sets), a large catch-all repository hosted by CERN and funded through EU Horizons. Data sets are individually registered and given a DOI, which provides a fool-proof way of attributing authors and tracking data set use.
This page details the submission of said data to the Svalbox community in Zenodo. Data managers are recommended to visit the data management page here.
Visit the Zenodo quickstart
This tutorial assumes users have familiarised themselves with Zenodo through the Get started Documentation on Zenodo. Why not give it a try at https://help.zenodo.org/docs/get-started/?
Submitting digital outcrop data#
Finalise the upload
Zenodo has a 50 GB upload limit per data package. Larger uploads will fail and are currently not supported. Contact the Svalbox data management team for alternatives, if needed.
Creating the data package#
Standardised data folder structure#
Digital outcrop data are expected to follow a strict standardised format and processing procedure as outlined in the Geo-SfM tutorial (albeit now zipped together on a per-folder basis). A more scientific discussion is given by [BRodesB+23] that details how such standardisation eases the use of automation and the extraction of geoscientific information. In its most basic form, a single digital outcrop model data set contains the following folder structure:
Show standardised folder structure
{project_directory} (The folder with all files related to this project)
|   image_overview.{ext}
|   description.txt
├───config.yml
├───data.zip
├───────{img_folder_1}
|           {img_0001}.{ext}
|           {img_0002}.{ext}
|           ...
├───────{img_folder_2}
|           {img_0001}.{ext}
|           {img_0002}.{ext}
|           ...
├───────...
├───────{img_folder_n-1}
|           {img_0001}.{ext}
|           {img_0002}.{ext}
|           ...
├───────{img_folder_n}
|           {img_0001}.{ext}
|           {img_0002}.{ext}
|           ...
├───────gcps
|
├───────GNSS
|
├───export.zip (where you place export models and files in)
|       ...
├───metashape.zip
|       {metashape_project_name}.psx
|       {metashape_project_name}.files
|       (optionally: {metashape_project_name}.log)
├───{metashape_project_name}_processing_report.html
└───{metashape_project_name}_processing_report.pdf
Each package forms a stand-alone data bundle, meaning that only data used for the generation of the model/data products is present. This always includes imagery, ideally sorted per flight/acquisition round. GNSS and gcps (ground control point data) are optional, but should include GNSS processing reports and quality estimates of the data when used during processing. Each of the folders must be zipped prior to uploading to maintain the standardised folder structure. Files, such as the processing reports, overview photo and description file are to be uploaded separately.
Include the correct model/tiled model data in the export
Make sure to include both an .obj (+ textures!; EPSG:32633 crs; model files) and a .3tz format (tiled model files; Cesium 3D Tiles 1.1 format in Metashape export dialog).
The configuration file#
Every upload must contain a config.yml file that specifies (some) of the key metadata for the DOM upload. These metadata are submitted in a machine-readable form that (upon curation) are ingested by the Svalbox database. As such, please make sure that the correct configuration file is used and that all relevant metadata are filled in!
A template for DOMs is found below. Copy this over into your favourite file editing application, fill out the details, and then save it as config.yml at the root of your standardised folder structure.
Show config.yml template
acq_camera_lens:  # [Req] Camera lens as indicated in the Agisoft Metashape processing report.. Unit: mm
acq_camera_model:  # [Req] Camera model as indicated in the Agisoft Metashape processing report.
acq_date:  # [Req] Acquisition date of data, in DD.MM.YYYY format.
acq_georeferencing: built-in GNSS # [Req] STRING, pick: built-in GNSS, dGNSS, GCPs, GCPs/GNSS, GCPs/dGNSS
comments:  # comments for data entry
cover:
- Category: Snow
  Extent: # [Req] pick from 0-5; 0=0%, 1=0-20%, 2=20-40%, 3=40-60%, 4=60-80%, 5=80-100%
- Category: Scree
  Extent: # [Req] pick from 0-5; 0=0%, 1=0-20%, 2=20-40%, 3=40-60%, 4=60-80%, 5=80-100%
data_author:
- affiliation:  # [Req] affiliations of author in comma-separated list
  name:  # [Req] name of author
  orcid:  # orcid ID of author
- affiliation:  # [Req] affiliations of author in comma-separated list
  name:  # [Req] name of author
  orcid:  # copy paste for number of authors applicable.
data_doi:  # doi number (without https://doi.org/)
data_model_file_name: {filename}.obj # [Req] STRING with model file name and obj extension.
data_model_crs_epsg: 32633 # [Req] INT EPSG number of model CRS
data_project_path:  # [Req] STRING with full path to the standardized data project.
data_type: DOM # [Req] Data type, defaults to DOM. Other options include DCM, DSM
funding:
- grant_number:  # grant number or name associated with the grant
  organization:  # organization identifier
- grant_number:  # Copy paste for all applicable combinations.
  organization:  # organization identifier #2
geology_age:
- Era: # Pick from
  Formation:  #
  Group: #
  Period: # Pick
- Era: # Pick from
  Formation:  # Copy paste for all applicable combinations.
  Group: #
  Period: # Pick
geology_tags:
- Category: # Pick from Structure/Sedimentology/Metamorphic/Igneous/Quaternary
  Subcategory: # Pick matching Subcategory from [Structure/]Dikes/Sills/Karsts/Folds/Extensional/Compressional/Faults/Joints/Fractures/Veins/Inversion or [Sedimentology/]Clastic/Carbonates and Evaporites or [Igneous/]Intrusive/Extrusive
- Category: # Pick from Structure/Sedimentology/Metamorphic/Igneous/Quaternary
  Subcategory: # Pick matching Subcategory from [Structure/]Dikes/Sills/Karsts/Folds/Extensional/Compressional/Faults/Joints/Fractures/Veins/Inversion or [Sedimentology/]Clastic/Carbonates and Evaporites or [Igneous/]Intrusive/Extrusive (select as many combinations as applicable)
keywords:  # [Req] list of keywords separated by ;. Last item without.
location_island:  # [Req] Island on which the locality is found, pick from Hopen / Spitsbergen / Kong Karls Land / Edgeøya / Barentsøya / Tusenøyane / Nordaustlandet / Kvitøya / Prins Karls Forland / Bjørnøya / Other
location_land:  # [Req] Land in which the locality is found, pick from Albert I Land / Andrée Land / Bünsow Land / Dickson Land / Haakon VII Land / Heer Land / James I Land / Nathorst Land / Nordenskiöld Land / Ny-Friesland / Olav V Land / Oscar II Land / Sabine Land / Sørkapp Land / Torell Land / Wedel Jarlsberg Land / Gustav Adolf Land / Gustav V Land / Orvin Land
location_locality:  # [Req] Location/area in which the locality is found. This should only contain valley/mountain names and not contain directions.
model_description:  # [Req] Brief (geological) description of the data.
proc_alignment_accuracy:  # [Req] Photo alignment processing value for generating depth maps. Pick from Highest, High, Medium, Low, Lowest.
proc_camera_stations:  # [Req] Total number of aligned, as stated in the Agisoft Metashape processing report files.
proc_camera_total_error:  # [Req] Total error of the cameras, as stated in the Agisoft Metashape processing report files.. Unit: m
proc_coverage_area:  # [Req] Area covered by the DOMs footprint, as stated in the Agisoft Metashape processing report files.. Unit: km2
proc_dc_filter_conf_min:  # [Req] Minimum dense cloud confidence value used for dense cloud filtering.
proc_dem_point_density:  # [Req] Point density of the DEM, as stated in the Agisoft Metashape processing report files.. Unit: points/m2
proc_dem_resolution:  # [Req] Resolution of the DEM, as stated in the Agisoft Metashape processing report files.. Unit: m
proc_depth_map_accuracy:  # [Req] Depth map processing value for generating depth maps. Pick from Highest, High, Medium, Low, Lowest.
proc_flying_altitude:  # [Req] Average distance between the camera and the object, as stated in the Agisoft Metashape processing report files.. Unit: m
proc_gcp_total_error:  # Total error of the georeferencing control points, as stated in the Agisoft Metashape processing report files.. Unit: cm
proc_georeferencing_count:  # Number of ground control/georeferencing points used for processing.
proc_georeferencing_crs_epsg:  # [Req] EPSG crs code used by the data used for georeferencing. NEEDED!
proc_georeferencing_type:  # Type of data/points used for georeferencing. Marker type and version (e.g., Aruco DICT_6X6_250) should be included.
proc_ground_resolution:  # [Req] Ground resolution of the DOM, as stated in the Agisoft Metashape processing report files.. Unit: m
proc_mesh_filter_con_comp: # [Req] Mesh filter value for connected component.
proc_sc_filter_proj_acc: # [Req] Sparse cloud filter value for projection accuracy.
proc_sc_filter_recon_uncert: # [Req] Sparse cloud filter value for reconstruction uncertainty.
proc_sc_filter_reproj_error:  # [Req] Sparse cloud filter value for reprojection error.
proc_software:  # [Req] name of software used for processing.
proc_software_version:  # [Req] Software version used for processing, including build number.
publ_embargo: 0 # [Req] Currently under discussion.. Unit: months
publ_related_identifiers:
- identifier:
  relation: # Please visit the https://developers.zenodo.org/ for examples.
publ_sketchfab_id:  # [Req] integer number associated with the data entry on the sketchfab. https://sketchfab.com/models/{SketchFab ID}
publ_v3geo_model: # The V3Geo model ID (obtained after submission on V3Geo)
Submission to Sketchfab/V3Geo
Upon submission of the data sets to Svalbox it is not needed to submit your model to SketchFab for online viewing. The Svalbox data managers will take care of submitting the 3D model to SketchFab as it forms the backbone of interacting with the model. If desired, users are encouraged to refer to the V3Geo uploading tutorial on how to create a model entry in V3Geo here.
The data set is now ready to be submitted for curation by the Svalbox data management team. Head over to Zenodo and follow the Zenodo and data submission section below.
Zenodo and data submission#
Tip
If at any stage you wish to take a break, simply click the Save draft option. This saves all current progress and simultaneously performs a form-check. That means that it checks all input metadata whether it fits the corresponding form/entry. Play safe and save often! :)
Fig. 2 Proceed by creating a new upload.#
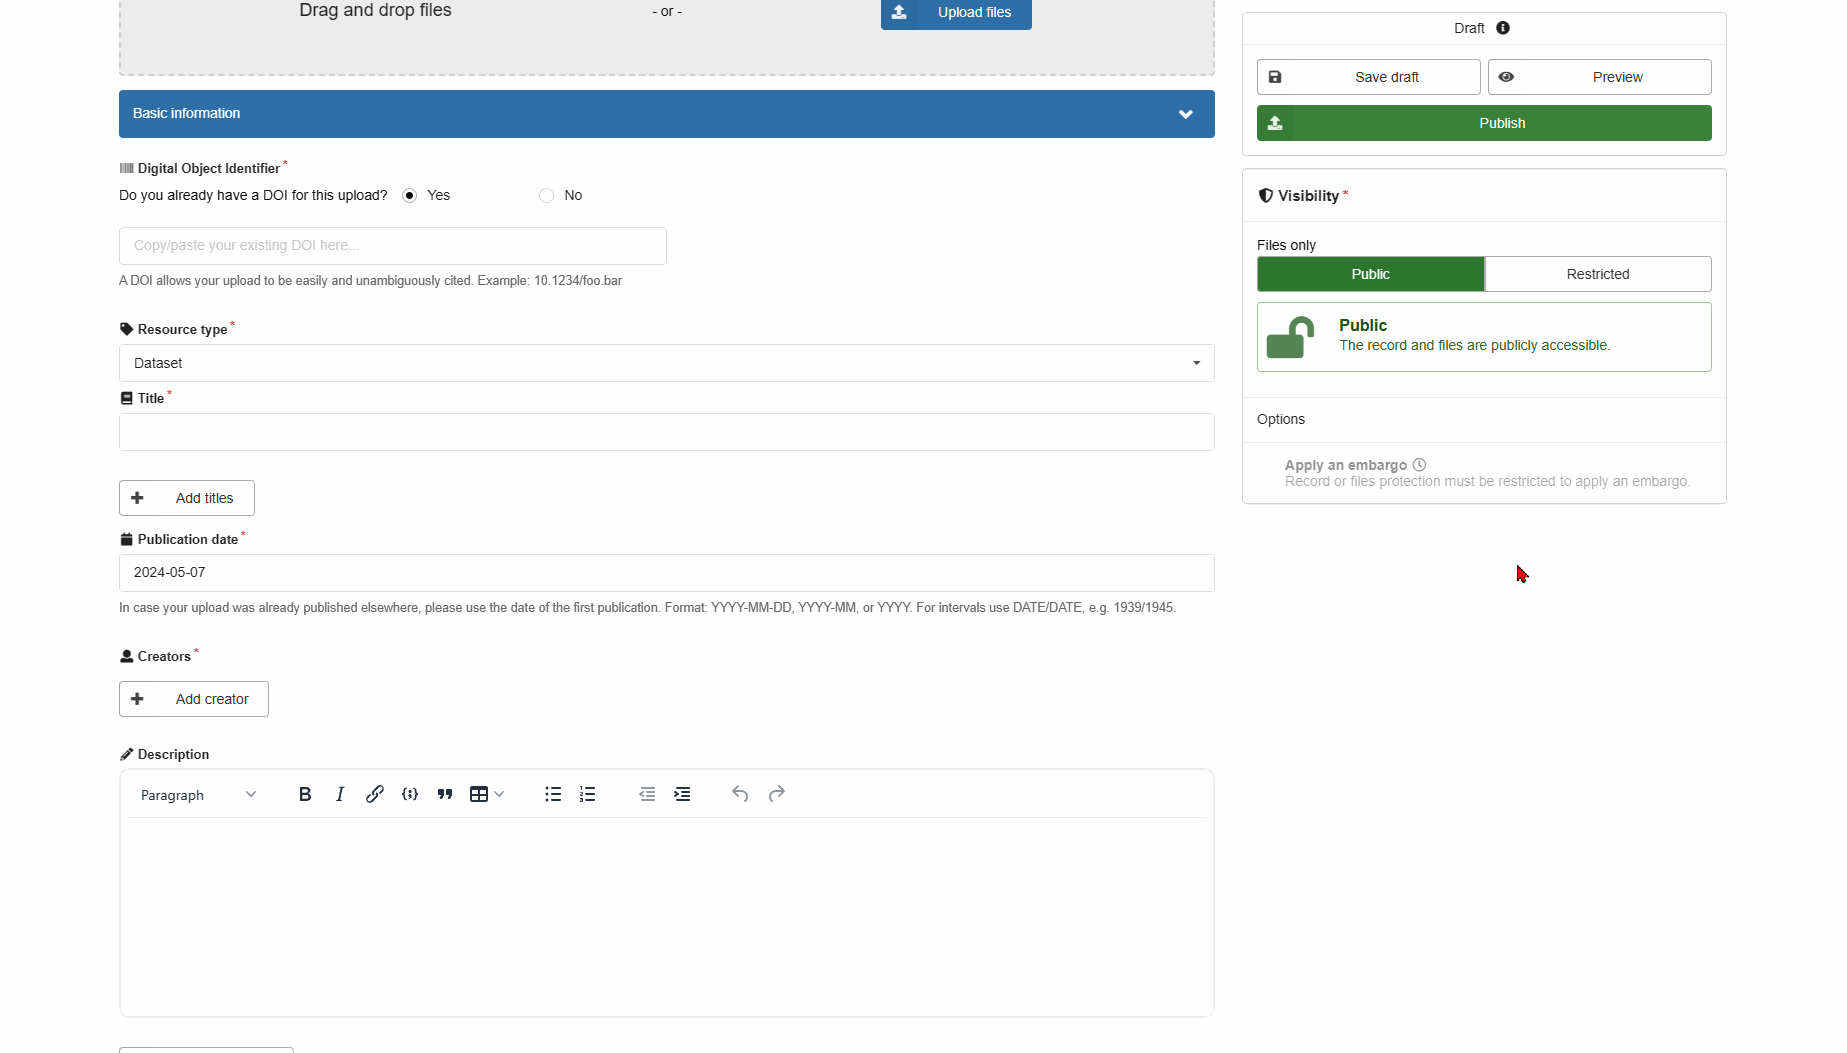
Fig. 3 First generate a DOI if the data set does not yet have one, give the data set a title, and insert the publication date.#
Svalbox Curators
Svalbox Curators should wait with uploading all files until they have checked the data sets and run the database uploading scripts. That way uploads only have to be done once. Please see the relevant sections on how to do this.
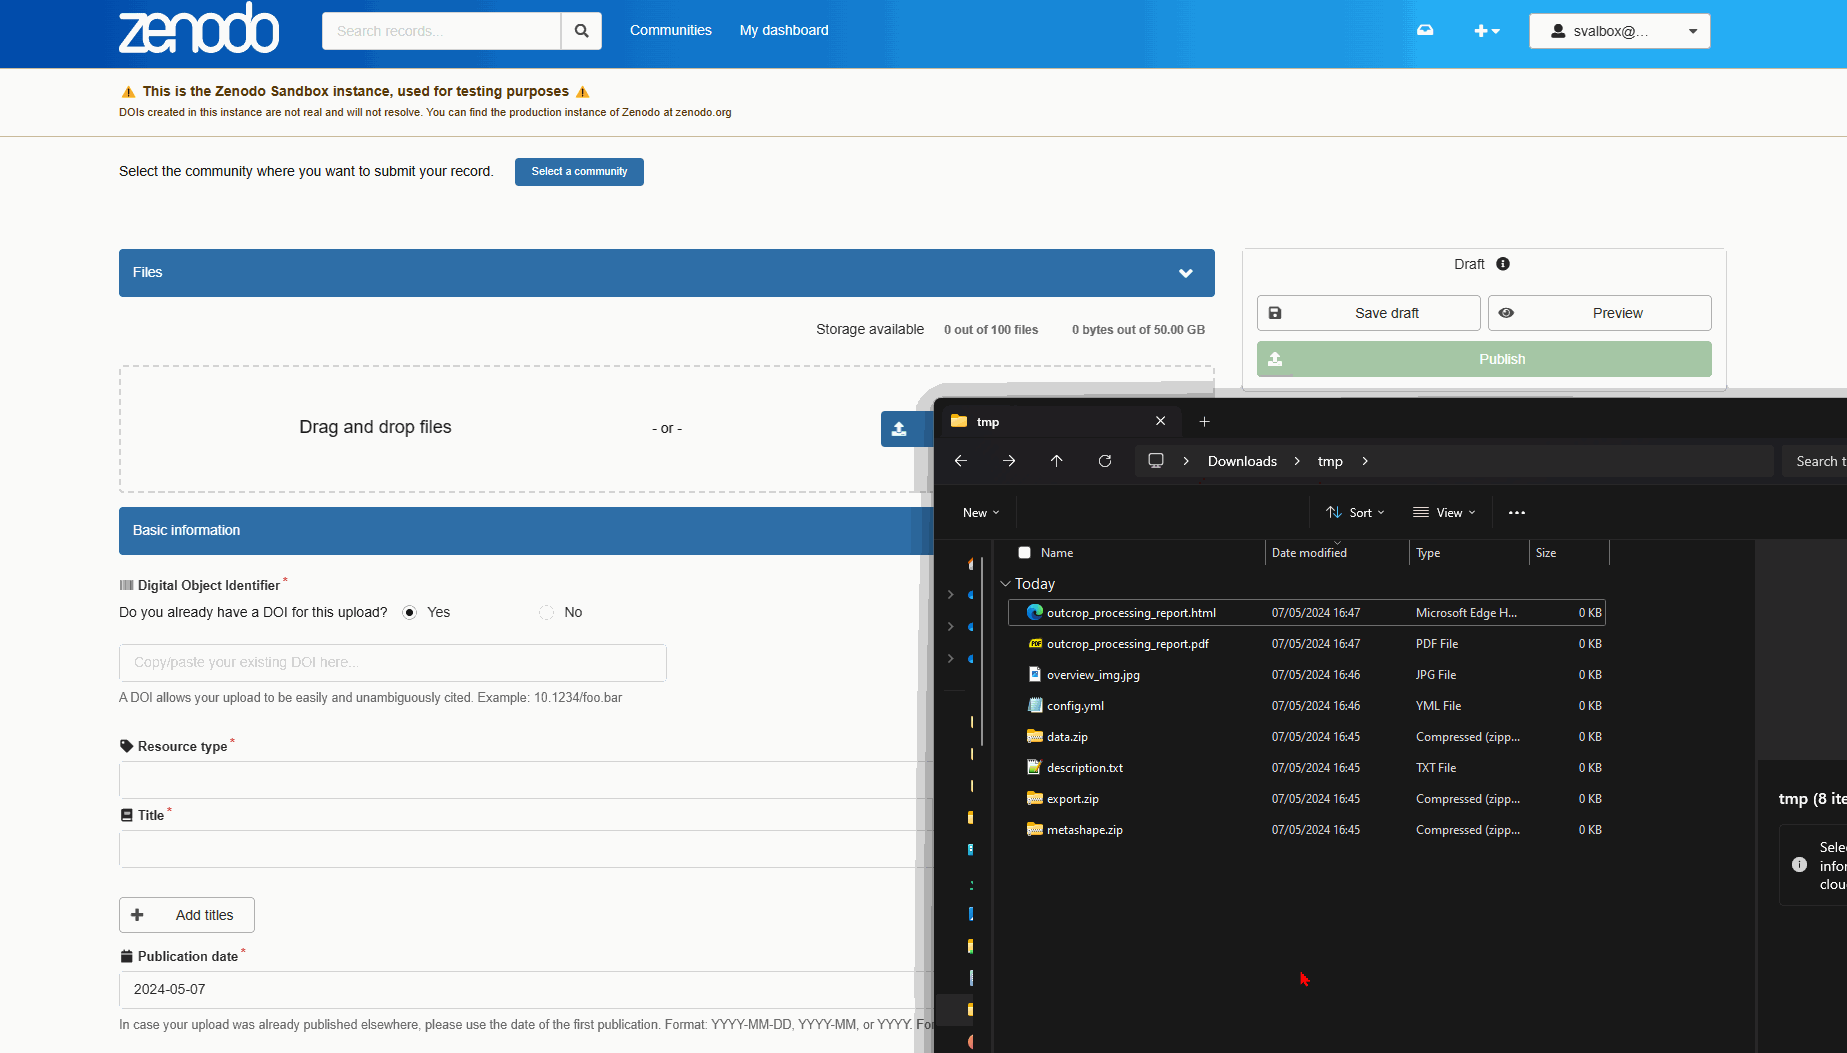
Fig. 4 Then proceed by uploading your standardised data folders.#

Fig. 5 Then add each Creator with their affiliations. This can be done by searching for their name, alternatively by filling out each field manually. Once done, press save.#
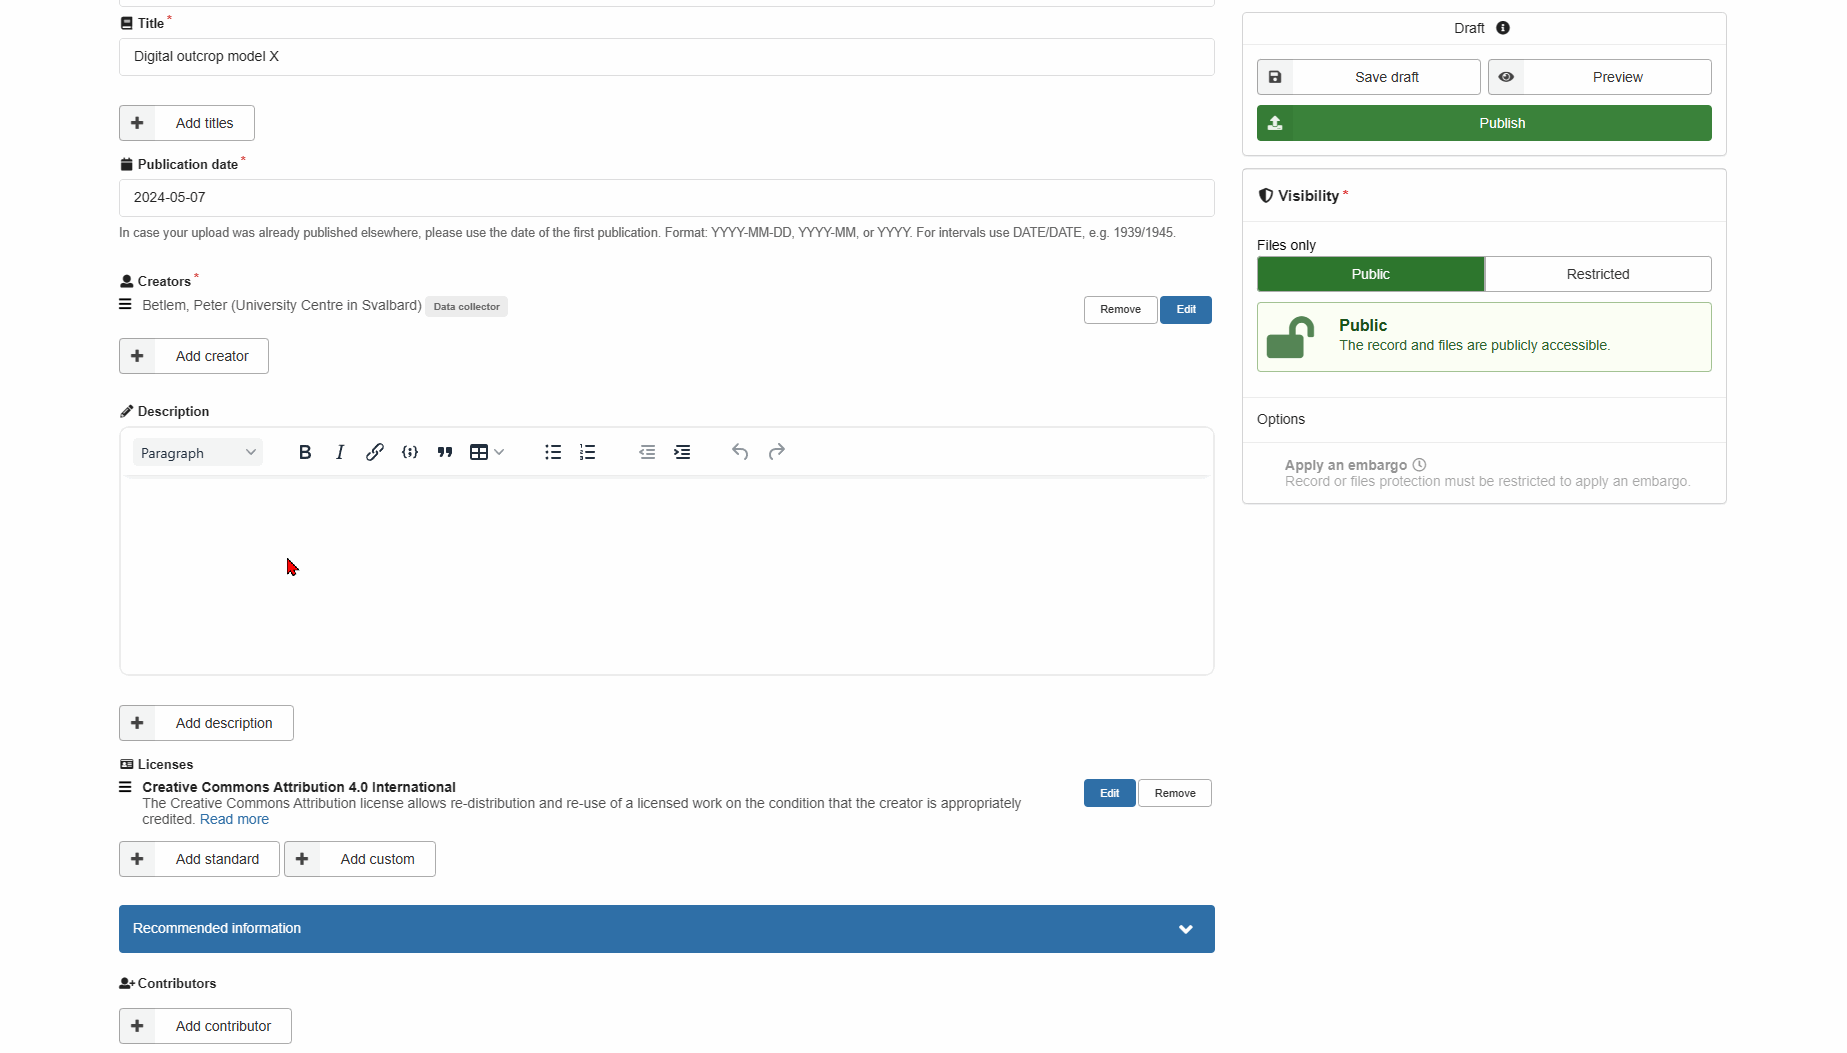
Fig. 6 Do not forget to add a placeholder description - though keep in mind that this will be updated by the data managers. Also make sure to select the licenses that will apply to the data. The Creative Commons licences are a good starting point to choose from, and allow for different permissions. If you are not sure which one to apply, take a look at their descriptions here. Make sure you only have selected a single license!#
The Recommended information section
Although not required by Zenodo, it helps filling out as much as you can, including in the Recommended information section. At the very least, try and add any other contributors that helped you with the data. Similarly, add all data acquisition dates.
Warning
Make sure to add Svalbox to the Publisher field. Otherwise you will be greeted with an error in the next step.
Finalise the upload
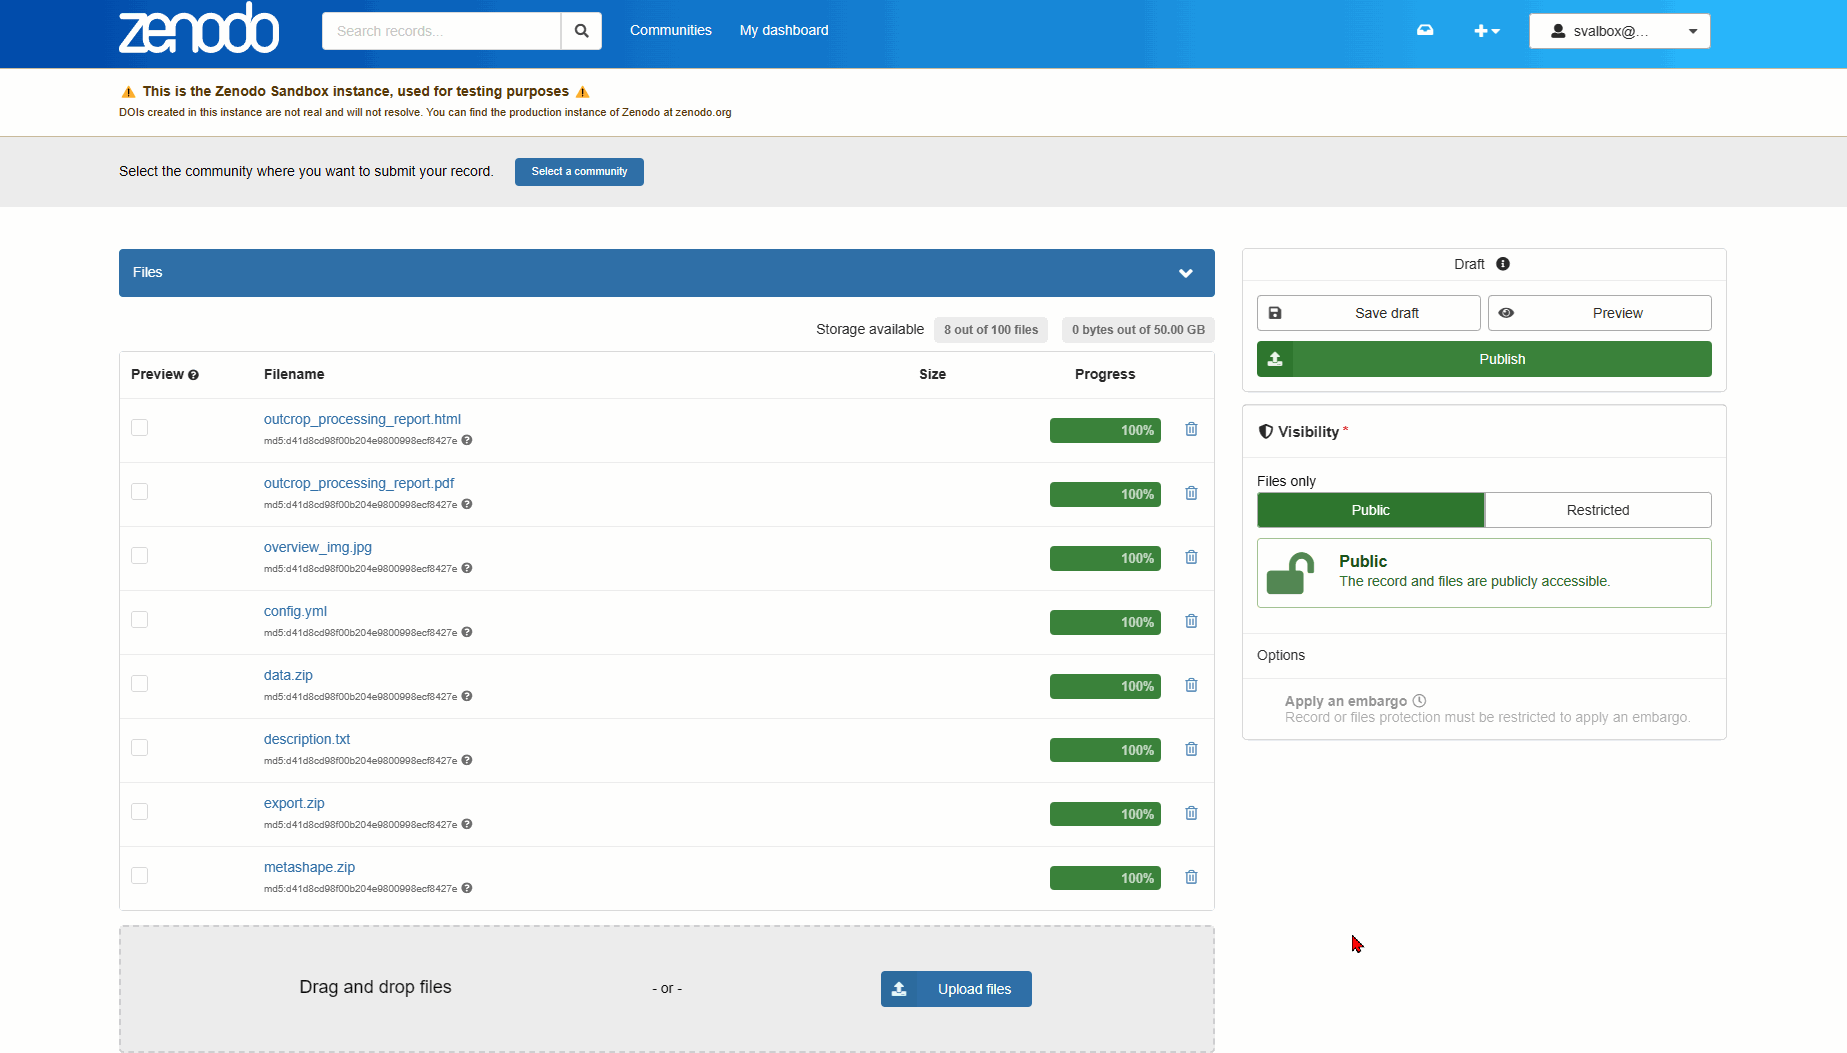
Fig. 7 Make sure to select the Svalbox community. Your Publish button now automatically changes to Submit for review, which is exactly what you want.#
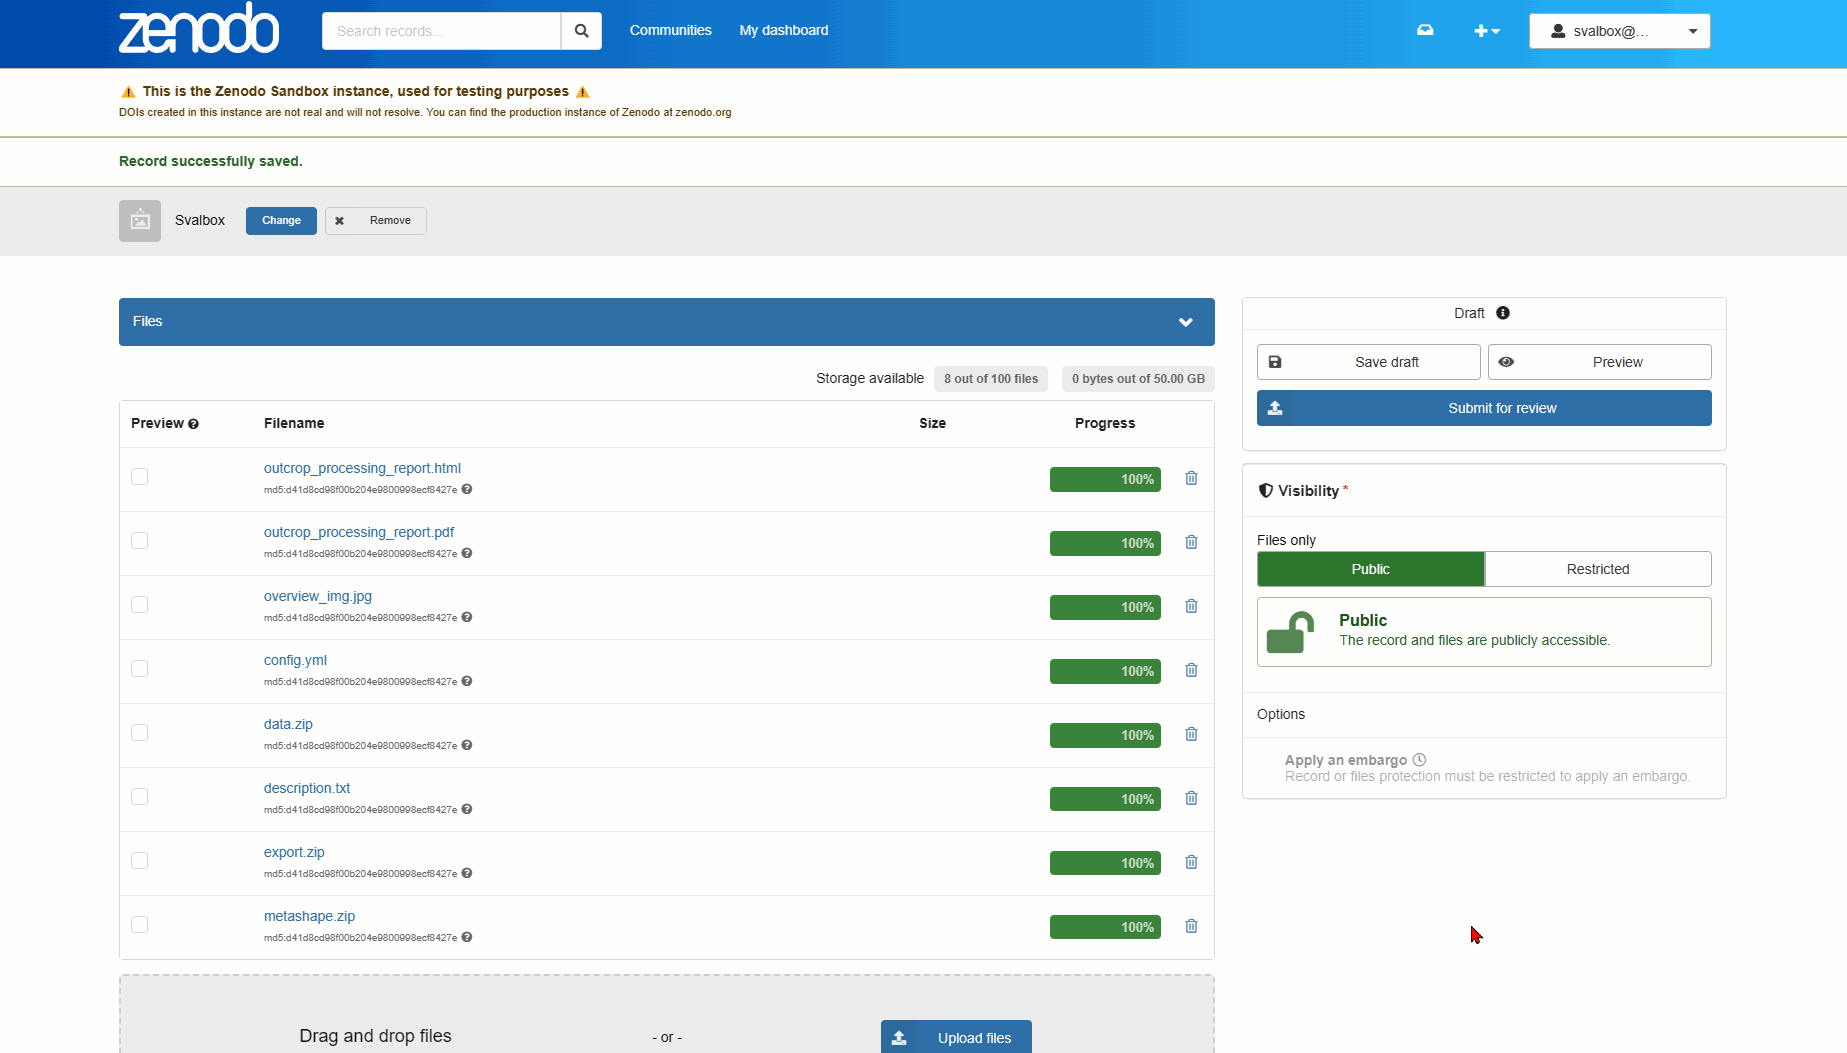
Fig. 8 Finally, select the Submit for review button. Check both boxes and leave a message for the data managers if you like. Then submit your data set for review. Give it a couple of days, and the data management team will be in touch through the requests discussion page.#